Flipboard Magazines with Google Docs

Two years ago, our language arts class tweeted photos explaining text-to-world connections while reading The Giver. That was an eighth grade class well versed in social media. This yescreenshot_2016-12-12-23-20-47ar I teach sixth grade and though Twitter doesn’t enforce their age requirement of 13, other social networking services like Facebook, Snapchat, Pinterest, and Instagram do enforce theirs. As a result, social media is still a few years away from most of my sixth graders – I’m not complaining!

Creating a Flipboard magazine from the student tweets was simple. All I had to do was assign a unique hashtag for the assignment, search for the hashtag in Flipboard, and flip the results – simple.

It’s not so easy this time, but I’ve found a solution that I want to share.

  1. Clean up the Google doc: Things like paragraph spacing and picture placement can make the post look odd if it’s not done right. What I’ve found is that tabbiscreen-shot-2016-12-12-at-11-26-28-pmng the beginning of each paragraph and keeping pictures in line with text work best. Make sure the title of the document is the title of the article and that student last names are removed.
  2. Publish: Click ‘File’ and ‘Publish to web’. This will open a window that gives you a link to the published document. Copy and paste link to open the published document.
  3. Flip it!: To complete this step, you’ll need the Flipboard + Flip It Google Chrome extension – get it here. Once you’ve added the extension to Chrome, click the extension to add the published document to your Flipboard magazine.
  4. Enjoy: Now that your published Doc has been added to your Flipboard magazine, you can share it with your students and colleagues.

Our students wrote newspaper articles loosely based on research they had done to create a video for the worldof7billion.org student video contest. Since they submitted their articles in Schoology via Google Drive, I can make a copy of the original documents to ‘clean up’ and then publish.


Differentiated Writing Instruction with Google Docs (Schoology Workaround)

**Update: Schoology has added a Google Drive Assignments application that allows students to work from Drive within the Schoology site itself. Thank you Schoology!

Details can be found here.


Quick post here – In the spring I wrote about how much I was enjoying writing instruction with Google Docs. I began this school year at a new school anxious to support my sixth graders during the writing process but hit a small hurdle when I learned that the LMS in middle school was Schoology. Schoology does have a Google Drive app that allows students to submit work from Drive. It does not, however, provide a way to collaborate on documents.

I manually went through the steps that Google Classroom automates and was happy with the results. Here are the instructions I gave students:

screen-shot-2016-09-26-at-1-28-00-pm

The document titles tell me the period, student name, and assignment name – as it would be in Google Classroom. I used five minutes in the beginning of class to get this set up. All of the files that students share with me are easy to copy and move from ‘shared with me’ to a specific folder for this assignment. This makes it simple to organize assignments by period or class and assignment.

At this point, all of the collaborative writing with synchronous feedback that I love so much is possible.


Differentiated Writing Instruction with Google Docs

Google Drive and its integration with Google Classroom has made a huge difference in my classroom. One of the biggest advantages I have seen so far is the opportunity to provide differentiated corrective feedback on student writing synchronously. This means I can give students (a whole class of students) comments and suggestions, and highlight errors as they write. The comments below show the range of support a teacher can provide based on the level of each student. Each comment asks the student to self-correct or clarify, though the effort required to make the correction varies in each comment, matching the ability of the student. As you look through comments, ask yourself what each comment requires the student to do to make the correction. In the past, differentiating writing feedback was a time consuming, ink-draining process that seemed to have little or no effect. Now, I feel like I can support the students appropriately while they are in the process of creating writing. Going through these processes with the teacher will help students retain what they learn.


Online Literature Circles: Week 2

In my most recent post, I outlined the steps necessary to set up online literature circles using Edublogs. Since then, the literature circles have begun, and we’ve just finished the fourth week. In this post, I’ll share some samples to show what is actually happening in the circles, and discuss the challenges and issues that have come since they started.

As you read, keep in mind that the students are already maintaining their own personal Edublog and are familiar with all of the procedures and tools necessary to post on the class blog. As a precaution, I made a short tutorial (click here for video) and gave a short reading assignment (chapter one of The Giver) to practice posting and commenting. I didn’t spend the entire weekend reorganizing student posts, so I have to say they were successful.

Each student receives a schedule, like the one here, which tells them what they are responsible for each week. It includes their role and a checklist that describes the three things that need to happen every week.

litcircschedule

Throughout the week, students read the text and develop the post for their specific role. Posts are due at the end of the week, and the summarizer in each group has up until the day of class to complete their assignment. This gives them a few days to read through all of their group’s post and summarize.

Instructions

Literature Circle Instructions

Role Descriptions

The links here are to the documents that are embedded in the class blog. These documents describe the overall assignment and the specifics of each role.

Example #1: Discussion Director

dd

This example shows the five questions that a discussion director asked their group. It also highlights one of the mistakes many discussion directors made in the first few weeks. While it looks like there are five questions here that cover the main points of the reading, the student failed to follow the specific instructions that come with being discussion director. Each question is supposed to serve a different purpose. For example, question one should be a closed question that makes sure everyone noticed an important plot detail. Question three should be a a question to the author, Lois Lowry. This question is supposed to spark discussion about something that would help readers better understand the text. In this example, the student is on the right track, but the way the question is formed is incorrect as the author would know who the old are.

In the future, I know I have to spend more time going through each type of question and provide more examples. Now that we’re in week five, most discussion directors are getting it right, but the confusion could have been prevented with clearer instructions. The response below shows that the questions did get the student to pull things together and draw some conclusions, but the product will be much better when the right questions are asked.

ddcomment

Example #2: Word Wizard

wordwizard

This is a good word wizard example. Each word comes with a sentence to contextualize it, a page number, the student’s own definition, and the dictionary definition. Many students comment on Word Wizard posts and say that they also didn’t know the selected words.

Example #3: Visualizer

visualizer

Visualizer posts with Fotobabble are going really well. Students are using the sentence frames provided in the instructions and are getting creative with their drawings. Students that don’t feel comfortable drawing can use another image or group of objects to depict a piece of the text. Last week, a student used his younger brother’s Lego figures to set up a scene from the reading instead of drawing a picture; it was well done and the class enjoyed it.

Example #4: Connector

connector

So far, the connector seems to be the most popular role as it receives the most comments. Students are doing a good job of making real world connections; however, in the future, text-to-text connections need to be a requirement. They are by far the least common connection that I’ve seen so far. Here are some comments to the above post.

connectorcomment

Example #5: Reflector

reflectorThis example shows the reflector commenting on big ideas as they work their way though the text. Page numbers need to be included so that the group members can follow the reflector’s thoughts as they read specific parts of the text.

Example #6: Summarizer

summarizer

The last student from each group to post each week is the summarizer. The summarizer’s job is not to summarize the reading, but to summarize the discussion that happened online. In this example, the students discusses the group’s response to the discussion director’s questions and the vocabulary selections. I would like to see more substance in the post and less listing. Students will often list all of the director’s questions and the vocab in a effort to lengthen the post, which is unnecessary. There is enough material in the posts and comments to write a good summary that highlights the most interesting material.

Though there are many small things that need tweaking before the next time this happens, the literature circles are making the reading that happens at home active and promoting a deeper understanding of the material through discussions and peer feedback. In our school, where many of the students need language support and lack the confidence to speak during classroom activities, the online literature circles are providing opportunities to request clarification, check comprehension, and to demonstrate understanding prior to class. This results in more participation and interaction and ultimately, more language development.

Online Literature Circles – Beginning Stages

Last year in our 8th grade Language Arts class, we used literature circles to read The Giver by Lois Lowry. We are using the book again this year, and to increase the amount of student talk that happens in the classroom, I am moving a lot of the discussion online. Since I have a large number of non-native speakers in the class, the online discussion serves as a primer for the discussion that will happen in class. If each student does their homework, they will be able to contribute to the group discussions in class. If you are unfamiliar with literature circles, here is a crash course.

To set this all up, I am using Edublogs (Pro). I put a lot of thought into finding the easiest way to get everything organized online in a way that is easy for students to navigate. This is what I’ve come up with. If you know a better way, please share ASAP!

First, I thought about what I needed to make available online.

  • Literature Circle Instructions
  • Role Instructions
  • Reading/Discussion Schedules
  • Groups
  • A place for students to post

I started by creating a page named ‘Literature Circle’. This is the main page for all of the work we’ll do in the unit.

lic1

I used a page and not a post so the content is always there, in the same place. Here, I will put up the general literature circle instructions.

Next, I created two more pages called resources and groups. These pages have the parent page Literature Circle. On the resources page, I will put up the role instructions; the groups page will have group lists and reading/posting schedules.

lc2

Now for the part that took the most thought. I’ve decided on categories as the way student posts will be organized. I chose this because selecting a category when you post is simple. Also, I can create the categories myself.

lc3

First, I created nine categories (Groups 1-9). Then, I added those categories to the menu below the groups page.

Now, here’s what I imagine happening when the assignments begin. Each group has one member that will start the discussion (summarizer). When the summarizer posts, they’ll have to click the category for their particular group. Once they do this, their group members will be able to find the post easily by clicking on their group from the drop-down menu. From there, the rest of the group can comment and add their own posts the same way.


Vietnam Tech Conference 2015

Here you can find copies of our presentation and all assignments/handouts that were shared during the presentation.

Presentation

tech conference a

Additional Materials

Instructions for blog post and url tweet

Help a Writer Out peer editing

Chain story prompts

Blog instructions

Blog post instructions 2

Twitter template

tweet corrections

We can also be reached at:

william.rago@ais.edu.vn

allison.peterson@ais.edu.vn

Guide to Edublogs Menus

Hi guys, in this post I’ll describe how to set up the menu in your blog just the way you like it. It probably looks something like this:
basic menuThis is boring! It doesn’t give visitors to your blog an opportunity to easily explore all the great content you’ve published.

It will take a few steps get everything organized. Here they are:

  1. Add new categories: Categories are a way to organize your posts. Each time you post, you will select the most appropriate category, or create a new category.
  2. Create a menu: We will get rid of the default menu and create our own.
  3. Add categories to the menu

The categories are a bit hard to find in your dashboard. Drag the mouse over ‘posts’. This will present you with a series of options (all posts, add new, categories, and tags). Click on ‘categories’. From here you can create your categories.

categories

Add new categories for whatever you like. For most of you, you might just want to add subject specific categories like Art and Language Arts. It all depends on what you’re going to publish on your blog.

The next step is putting the categories on the actual menu that shows up at the top of your blog. First, click on ‘appearance’, then ‘menus’.

appearance1

To start, your menu editor will look like this. The first thing you want to do is remove the ‘sample page’. Click the drop-down arrow in the ‘sample page’ box, then click ‘remove’.

basicmenuNext, we’re going to add the categories you just created to the menu. On the left side, you will see pages, links, and categories. Click on ‘categories’. addcat

It’s important that you click ‘view all’. Now, check the boxes next to the new categories you’ve created and then click ‘add to menu’.

Now that we’ve added your categories to the menu, all that’s left is to organize the menu structure. If you look at the structure of our class blog below, you can see how I’ve divided up menu items and sub-items. Home, Who We Are, Gallery, Our Work, and Forums are the main menu items. These are what you see at the top of all pages within the blog. The other items here appear when the mouse is dragged over the item above it in the hierarchy. For example, if I want to see pictures from art class, I must drag my mouse over ‘Gallery’ first, then ‘Photos’, then ‘Art Class’ will appear for me to click on.

menu structure

For right now, you do not have to create a menu like this. All you need to do is remove the sample page and replace it with language arts. Here is an example of a simple menu structure and the actual menu:

simplemenusimple exampleHere you can see that dragging the mouse over ‘Language Arts’ brings up the ‘poems’ sub-item.

Once you have the menu set up the way you like it. Click ‘create menu’. Also, click the two check boxes and save it all one more time.

This is the first step in customizing your blog menu. Please ask any questions you have in class, through email, or tweet them to me @tesolwar.

Grade 8 Language Arts, Twitter, and our First Flipboard Magazine

Setting up Twitter

In this post, I will describe how we are beginning to integrate Twitter into our 8th grade English Language Arts classroom. We introduced Twitter just last week, and it is the first time to do so for both myself and my co-teacher. Fortunately, we have tech specialist TechGirlAsia (@jena_simon) to share her expert knowledge and guide us. Thanks, Jen!!

The first thing we did was create a class account. I created a Gmail account for the class that both teachers share. I didn’t want our email accounts to blow up with Twitter interactions, and since Gmail allows us to collect mail from separate accounts, it seemed like a good idea – so far, so good. Second, we created the class twitter account and set up the twitter profile. We used fotor.com to create our header photo. I take lots of pictures during class and threw a few together on fotor and fit them into the 1500 x 500 header.

The next step was a bit more challenging to figure out. We needed a way to constantly monitor what goes up on our feed. At first, I thought it would be great to follow all of the students, but this would result in a feed full of K-pop and ‘fandom’ posts (what is fandom?) since many students are already Twitter users.

fandom


“A kingdom of fans, Mr. Bill!!!” shouts a student who has 3300 Twitter followers. It’s true. Anyway, to easily manage what shows up in our feed, we followed Techgirl’s advice and didn’t follow any of our students. Instead, we use hashtags to get student tweets on our feed. To do this, we had to use another program – Tweetdeck in Chrome and Tweetcaster for Android. What these programs allow us to do is follow a hashtag. This can’t be done in Twitter alone, which is unfortunate because I am now getting notifications from two apps. They work by saving a hashtag search in some form of a column. For example, our first Twitter assignment is shown below.

twitter1 edmodo


In this assignment, we ask students to tweet a picture of something from their lives that connects to Lois Lowry’s The Giver. All students tweet using the hashtag #ais8giver. This is a unique hashtag that we created specifically for this unit. Now, when students tweet their picture, it shows up in Tweetdeck or Tweetcaster in the saved search column. From here, all I have to do is retweet so it will show up on my feed.

giver connex


The class feed ends up looking like this:

asi8ela feed giver

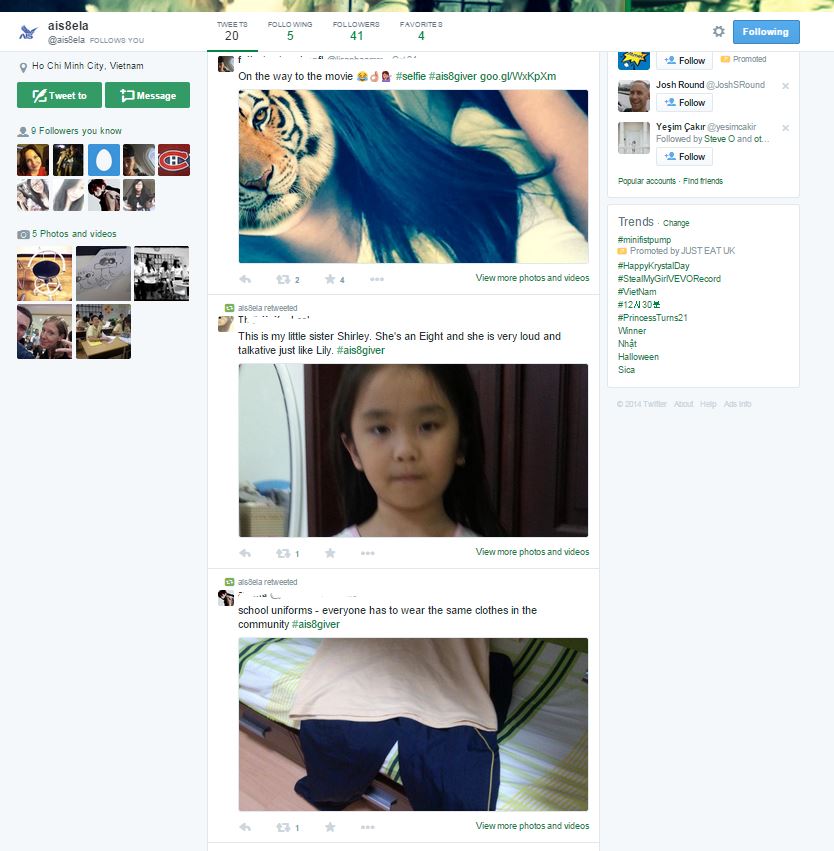
Here, you can see that these were retweeted by @ais8ela. This gives us complete control over what goes on and stays on the wall. Of course, a student could still post to our feed by adding @ais8ela to their post. In that case, we have to edit, retweet, then delete.

This is where we are right now. Our first assignment is due on Monday and Tuesday. It’s working pretty well so far, and I will keep updating this post as we attempt to do more cool stuff with Twitter in the classroom. Thanks for reading!


Publishing Student Work

Students were pleasantly surprised when I shared a digital magazine I had created with Flipboard consisting of their tweets. They thought that the assignment had ended the moment they tweeted their picture. Creating the Flipboard magazine wasn’t too hard, but there were a few things I learned along the way about digital citizenship and internet safety that need to be mentioned.

As soon as TechGirlAsia opened my eyes to the possibilities of Twitter in the classroom, I was off to the races. In less than a day, I had all of my students signed up to twitter and an assignment ready to introduce. I overlooked a few things that caused some extra work later on in the process.

After creating the first magazine, I realized that each post included their full names (a no-no) and that the posts contained too many language errors. To keep the students’ identities anonymous, I had to retweet once again and delete the @student name. This puts the tweet in the class feed anonymously, as shown here:

anonymous post

Second, to deal with language errors in the post, we did two things. First, we practiced writing tweets by hand in class and had students edit each other’s tweets. Second, We analyzed and edited a few tweets as an entire class.

In addition, during the process of retweeting, I edited the tweets myself. To follow up on this, I asked students to find my edited tweet and compare it to their original tweet. Next week, they’ll bring in a short paragraph explaining the changes I made.

Now, onto Flipboad.

Creating the magazine in Flipboard is very simple for a few reasons. First, Flipboard allows the user to search for hashtags. After logging in, click on the search icon (magnifying glass) and insert the hashtag you’ve created for your assignment.

Screenshot_2014-10-30-13-11-15

Click on ‘Tweet mentioning #______’. Flipboard will give you all of the tweets that have that hashtag. Next, look for the small + icon in the corner of one of the tweets, or long-press the tweet and click ‘flip into this…’

Screenshot_2014-10-30-13-12-05

You will be prompted to add the post to an existing magazine, or create a new one. Keep in mind, if you have a few magazines there will be pages here, and the ‘new magazine’ option is not on the first page.

Screenshot_2014-10-30-13-14-21

Once you click ‘new magazine’, you can add the title and subtitle for the magazine, and set the category and sharing options. Now you’re digital magazine is ready to be shared. A cool thing I figured out accidentally is that adding @Flipboard to your tweet when you share the magazine creates a link directly to Flipboard from the tweet. Awesome!

Here is our final product:

Screenshot_2014-10-30-13-10-24

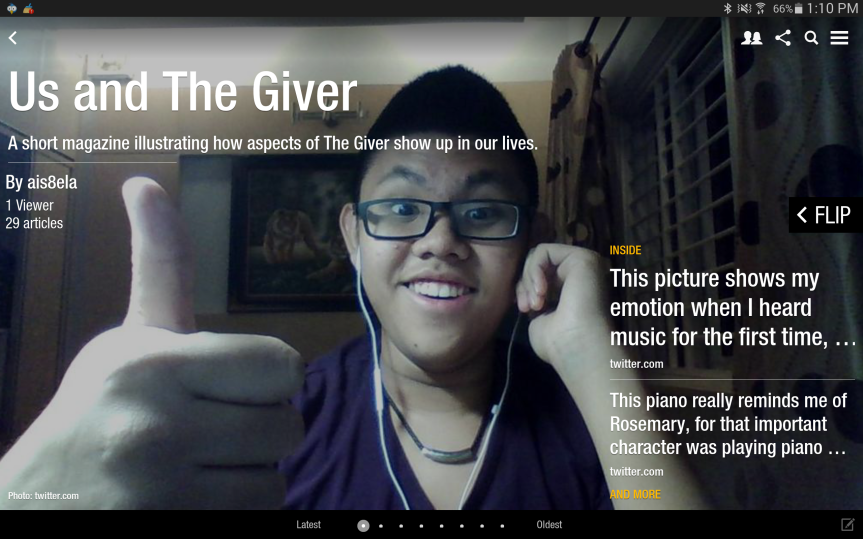
Also, long-pressing one of the articles within the magazine will bring up the options that allow you to promote one article to the cover. Our main man Jazz deserves the cover for his great tweet.

CLICK HERE TO VIEW OUR MAGAZINE